What is Astro?
The Astro framework, which recently saw the release of version 5.0, has been enjoying immense popularity among developers for some time. Its ease of use and flexibility allow for very quick and easy creation of websites that primarily require lightness and speed - pages created with Astro are built statically, which means that mainly ready-made HTML files go to the server, which are then sent to users' browsers directly, without the need to generate dynamic content on either the server or client side.
This avoids unnecessary work on the server side and the creation of huge files (so-called bundles), which the browser has to download, parse, and handle in real-time, as is the case with modern SPA web applications. Users' browsers, therefore, receive only HTML with content and a small set of optimized files that allow for interaction and smooth transitions between pages.
Of course, if a specific project requires it, we can bring any library to work with Astro – Svelte, React, or Vue. In the case of this blog, however, this was not necessary, and therefore what you see is maximally optimized in terms of performance and file size, and this is what I cared about when choosing the right tool for its creation.
CMS integration - Contentful
Another incredibly important aspect for me was cost. I wanted to have access to a convenient content management system, but one that wouldn't rip me off for basic operation, while also allowing me to write content in two languages, and ultimately the choice fell on Contenful. Its free plan allows you to create a single space for content, support for up to two languages, and limits of 50 GB of transfer and 100,000 API requests per month. Considering that requests to the Contentful API will only be made when rebuilding the application (due to code or content updates), I considered these limits more than sufficient.
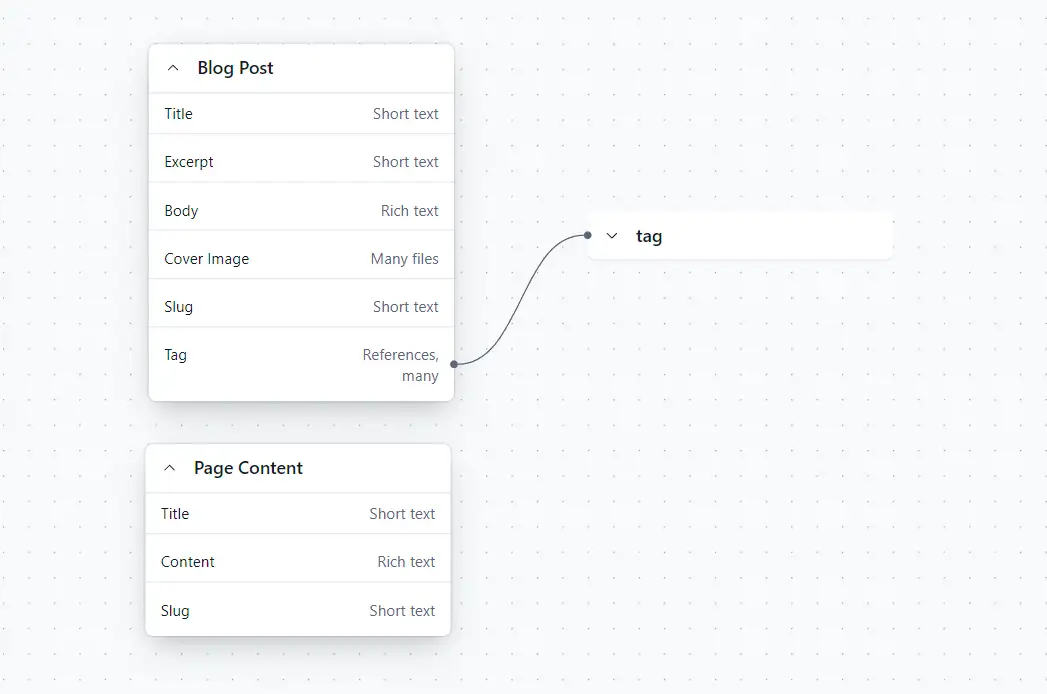
On the Contentful side, I have created two very simple content models – "Blog Post" and "Page Content." Both contain a title and a so-called slug, which is a normalized text string, created dynamically based on the title, by which you can refer to a specific entry instead of, for example, an ID number. Thanks to this, in the URL leading to a specific entry, we see its title, written in lowercase and with spaces replaced by hyphens.

Then, on the Astro side, I am able to pull entries and content from Contentful using the official contentful JS package. Below is a simple configuration I use.
import contentful from "contentful";
export const contentfulClient = contentful.createClient({
  space: import.meta.env.CONTENTFUL_SPACE_ID,
  accessToken: import.meta.env.DEV
    ? import.meta.env.CONTENTFUL_PREVIEW_TOKEN
    : import.meta.env.CONTENTFUL_DELIVERY_TOKEN,
  host: import.meta.env.DEV ? "preview.contentful.com" : "cdn.contentful.com",
});

export type ContentfulLocale = "en-US" | "pl";

export const languageToContentfulLocale: Record<Language, ContentfulLocale> = {
  [Language.pl]: "pl",
  [Language.en]: "en-US",
};
Posts and content from the API are fetched as an array of elements, displayed sequentially. Using the documentToHtmlStringfunction from the @contentful/rich-text-html-renderer package, I am able to convert this data to plain text containing HTML code and simply display it on the page.
To style each of the elements sent by Contentful in my own way, you can create a configuration object that will make documentToHtmlString display each element exactly as I want.
import {
  documentToHtmlString,
  type Options,
} from "@contentful/rich-text-html-renderer";

const options: Options = {
  renderNode: {
    [BLOCKS.PARAGRAPH]: (node, next) =>
      `<p class="mb-4">${next(node.content)}</p>`,
    [BLOCKS.HEADING_1]: (node, next) =>
      `<h1 class="text-lg md:text-2xl">${next(node.content)}</h1>`,
    [BLOCKS.HEADING_2]: (node, next) =>
      `<h2 class="text-md md:text-lg">${next(node.content)}</h2>`,
    [BLOCKS.HEADING_3]: (node, next) =>
      `<h3 class="text-md md:text-xl">${next(node.content)}</h3>`,
    [BLOCKS.EMBEDDED_ASSET]: (node) => {
      const { title, description, file } = node.data.target.fields;
      return `
        <a
          href="${node.data.target.fields.file.url}"
          class="my-8 block"
          target="_blank"
          rel="noopener noreferrer"
        >
          <figure class="flex flex-col items-center gap-2">
            <img
              class="w-full max-w-[80%] bg-brandGray-200 dark:bg-brandGray-700 rounded-sm lazy-image [&[data-src]]:blur-md"
              width="${file.details.image.width}"
              height="${file.details.image.height}"
              src=""
              data-src="${file.url}"
              alt="${title}"
            />
            ${
              title || description
                ? `<figcaption class="text-center w-full max-w-[80%] flex flex-col gap-1">
              ${title ? `<span class="text-sm">${title}</span>` : ""}
              ${description ? `<span class="text-xs">${description}</span>` : ""}
            </figcaption>`
                : ""
            }
          </figure>
        </a>`;
    },
    [INLINES.HYPERLINK]: (node, next) =>
      `<a href="${node.data.uri}" class="text-primary hover:underline">${next(node.content)}</a>`,
  },
  renderMark: {
    [MARKS.CODE]: (text) => {
      const regex = /^lang:(\w+)/m;
      const match = text.match(regex);

      if (!match) {
        return `<code>${text}</code>`;
      }

      const language = match[1];
      let code = text.replace(regex, "").trim();

      return `<pre><code class="language-${language}">${code}</code></pre>`;
    },
  },
};

const bodyHtmlContent = documentToHtmlString(body, options);
Then in the template code:
<div
  class="...klasy tailwind..."
  set:html={bodyHtmlContent}
/>
Displaying and formatting Code blocks - Prism.js
Since this is supposed to be a blog about programming and frontend development, it was necessary to think about how to present source code to readers in an accessible way. Unfortunately, browsers cannot do this on their own – the <code> tags are treated as plain text to be displayed in black and white (or white on black, depending on the styles set), and therefore I needed the help of another external library.
For this task, I found two potential candidates – Prism.js and Highlight.js. The choice was relatively simple again – the minified JS file in the case of Prism.js, along with the required dictionaries that you choose yourself, is about 75% smaller than Highlight.js, and therefore the browser has less code to download, parse, and execute, and as we already know, I care about maximum optimization here. Additionally, I can change the code formatting in light and dark mode whenever I want by simply replacing the appropriate CSS files.
Image optimization and lazy loading
The biggest arch-nemesis of fast page loading is definitely images. These can reach sizes in the hundreds of kilobytes, if not megabytes, if they are not properly optimized. In this section, I will present the tools and techniques that I use every day and in every project I participate in. On this blog, wherever possible, I use the WEBP format, which currently offers the best ratio of image compression to its quality.
I run raster images (JPG, PNG, WebP) through free optimization tools before publishing – for smaller ones (up to 5 MB), TinyPNG works perfectly, for slightly larger ones – Squoosh, which allows you to customize the compression configuration in dozens of different ways and techniques.
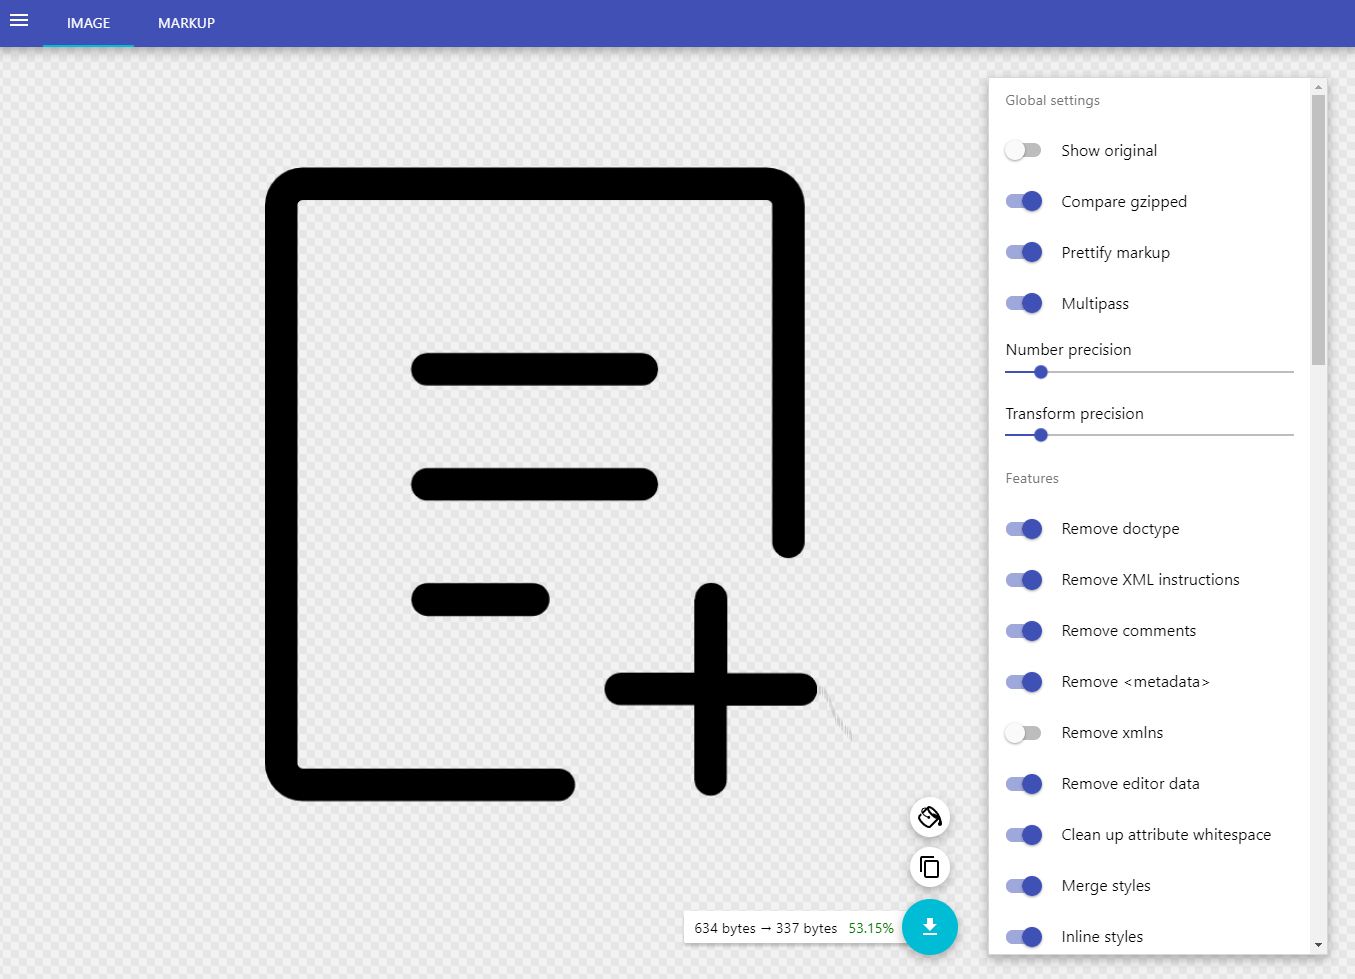
I also use several SVG icons on the blog – I optimize these using SVGO and an unofficial web application that provides a user-friendly interface – SVGO's Missing GUI. In the settings, I enable the removal of absolutely everything except the xmlnsand viewBox attributes. I set Number Precision and Transform Precision to the lowest possible values that do not spoil the icon's appearance.

Images in posts are lazy-loaded – only when the blog reader scrolls the displayed entry a bit, and their reading area gets closer to the image's position, will it start loading. I achieve this using the loading attribute in HTML, thanks to which the browser knows which images this rule should be applied to.
Dirt cheap hosting - Mikr.us
I have already mentioned that I am a fan of solutions that are as cost-free or low-cost as possible. Choosing completely free hosting would be possible, but in most cases, it would be associated with some unpleasant side effects: such as displaying non-optional ads or monthly transfer limits.
So I opted for Mikr.us - a company providing very cheap VPS servers. The price for the cheapest server with Ubuntu is only PLN 35 per year! This is quite enough to host a basic website based on static files, and that's what this blog is after building the production version.
Admittedly, I haven't had much experience with configuring servers beyond those I use to run applications locally in development mode, so this was a perfect opportunity to finally learn a bit more about the subject. The Nginx configuration tutorial published on the official Ubuntu distribution website was very helpful here.
Github Actions and automatic building
Since most things on VPSs are set up using the terminal and SSH connection, I decided that the simplest and easiest way to automatically build and publish a new version of the blog after updating the code or content would be to use the drone-ssh plugin and configure it to execute a few simple commands on my VPS.
On the server, I set up a special user who has permissions only to work on folders related to the blog. This user also has a special SSH key that allows connection to my Github account. Therefore, just after I personally do a git push to main on Github, or publish a post on Contentful, Github Actions triggers an action with the drone-ssh plugin, and it performs the following actions:
Connects to the SSH server, to the specified user account.
Goes to the folder with the blog files. Its repository is cloned in it.
drone-ssh executes the commands:
git pull,pnpm i,pnpm build.
Below is the entire workflow code that is handled by Github Actions.
name: Deploy blog to VPS

on:
  repository_dispatch:
    types: [publish-event]
  push:
    branches:
      - main

jobs:
  deploy:
    runs-on: ubuntu-latest
    steps:
      - name: Deploy to VPS
        uses: appleboy/ssh-action@master
        with:
          host: ${{ secrets.VPS_HOST }}
          username: ${{ secrets.VPS_USERNAME }}
          key: ${{ secrets.VPS_SSH_KEY }}
          port: ${{ secrets.VPS_PORT }}
          script: |
            export NVM_DIR=~/.nvm
            source ~/.nvm/nvm.sh
            source ~/.bashrc
            cd /var/www/patrykb.pl
            git pull origin main
            pnpm i --reporter=silent
            pnpm build --silent
As you can see, this is an extremely simple script – I would even say rudimentary; but it works and fulfills its purpose!
The [publish-event] indicated above is related to Contentful – after publishing or updating anything in the content on the CMS side, Contentful sends a request with an event via webhook to Github, thanks to which Github knows that it should trigger the action at that moment.
Summary
Creating this blog with the help of Astro, Contentful, and other tools that I use every day was a pure pleasure, and I feel that it would be hard to choose a better set to achieve my goal. Ease and speed of creation, satisfying performance, and negligible costs – if this is something that you also value, be sure to try the things I have described.
